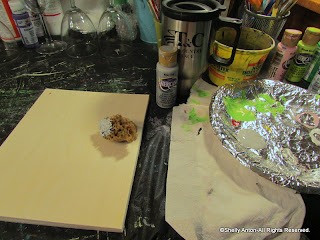
Step 2: Choose any acrylic paint color and a sponge. I use Styrofoam plates as a palette. I cover it with foil to make the plates last longer. My sponge is wet, but not dripping wet. I chose gray paint.
Step 3: I always use my old hair dryer. This definitely speeds up the process. It is also great for drying mid-way through projects to eliminate smearing!
Step 4: I do most of my work free hand, but I wanted to show you an easy way to do fancy font. I believe this font is Harrington. I make it the size I want, then print it out. I usually draw a box around the text to help center on the project.
Step 5: This is a graphite pencil I use to shade the back. Sometimes I use pink or white chalk instead - it depends on the project. A regular pencil will do as well.
Step 6: Turn the paper over, place it on the board, and trace with a mechanical pencil.
Step 7: I don't push super hard because I only use this for a guide and spacing. If you push harder or use more pencil rubbing on the back, it will be darker.
Step 8: I have a favorite liner brush. I am really hard on them, so I hope this one doesn't decide to "fan" out soon.
Step 9: Begin painting!
Step 10: I am left-handed, so I have to paint right to left. Believe it or not, I think I can paint cursive better right to left than left to right.
Step 11: All done with the words! I love this font - it seems to match this bible verse perfectly!
Step 12: Now for the fun dandelions! I water down my paint a smidge. These are just free hand. Every dandelion is different, so you really can't mess up.
Step 13: My dandelion paintings have been very popular.
Step 14: The black and gray dandelions are finished...now where to add the white one?
Step 15: Okay, I decided to add two white ones. :) All done!
Here are some more I painted today...
Have fun painting! If you are not a painter, you may click on the pictures to purchase one of these.
Thank you for visiting with me!
Click "LIKE" if you enjoyed this tutorial!


Easy to understand and I like the humor.
ReplyDeleteI do most of my work free hand, but I wanted to show you an easy way to do fancy font. I believe this font is Harrington. I make it the size I want, then print it out. I usually draw a box around the text to help center on the project. personalized wood cabin signs
ReplyDeleteNew to a project like this, do you shade the whole back side of the paper?
ReplyDeleteYou do not have to shade the entire back side - just the parts you want to show up.
DeleteWhat is your favorite liner brush?
ReplyDeleteThe cheapest at Hobby Lobby :) It varies. Thanks for visiting.
DeleteAwrsome! Thank you!
ReplyDeleteLooks so pretty.
ReplyDeleteLOVE your instructions! Wish I would've found them LONG ago, like when I was still using a typewriter, in the '70's!!!😂
ReplyDeleteBut really, you make it SO simple, not wordy and give pictures too! And I LOVE the verse you choose! "Be still and KNOW that I am God". I teach Children's Worship in our church and we say that verse and actually sing a song that is just that verse. One Sunday morning a sweet little boy asked me if I was God! Now at the beginning of every school year we always make sure they understand that we're singing to our Heavenly Father! Oh, from the mouths of babes!
With Ipe wood decking, you get the magnificent look of tropical hardwood. There are natural variations of color throughout the wood of Ipe decking and very few knots. You can stain this wood, but when they install Ipe decking, California residents like to leave it natural. Under the California sunshine, Ipe wood turns a beautiful silver color when you let it age naturally. The same thing applies to the aging process of the wood in any location.Ipe Wood Decking
ReplyDeleteRegardless of whether it is telling you the best way to apply a completion to a finished task, or how to make a mortise and join joint, something new can be taken in consistently. Then, is purchasing instructional DVD resembles the ones made by Fine Woodworking Magazine. Aluminium ramen
ReplyDeletetrimming tool, drill, nailer and wood squares. They are utilized to associate two bits of wood. Some hand devices are as per the following: wood CNC machine
ReplyDeleteWith energy prices out of control, so many people are looking at burning wood as an alternative fuel. So what can you do to cut down on the smoke output, and maximize the heat output? basic wood working
ReplyDeleteThis grain is uniform and straight with little pores that have no particular course of action just as unmistakable development rings. Poplar [Yellow Poplar] is a tolerably softwood that is utilized in making modest furnishings and in mix with more costly woods. It is somewhat light weighted wood and is not difficult to work with hand apparatuses. luxury home furniture stores
ReplyDeleteThe beauty of a blazing wood stove is that it is adaptable to any kind of environment. You can use it in the coldest parts of the country or the hottest areas of the world. Blaze King
ReplyDeleteCement might hold up better, however may as yet permit water to accumulate under the wood.
ReplyDeletecontinuous veneer dryer